Wednesday, May 20, 2009

Bypass Firewall and Proxy Restrictions download Torrent

so here the solution

1) http://www.your-freedom.net/. Download your-freedom software and install

2) Main Window -> Status -> Configure


3)


Now open Utorrent
Options -> Preferences ->


Tuesday, May 12, 2009

COM Surrogate Has Stopped Working

This error occur COM Surrogate has stopped working whenever you browse folders containing video or media files,
The reason are
1)NEvideo.ax real culprit
2)dllhost.exe crashes


Solution
1)Install the latest version of Nero (7.7.5.1)or above and fixed all the problems

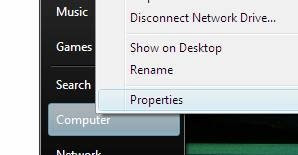
2)Right click on Computer, and choose Properties


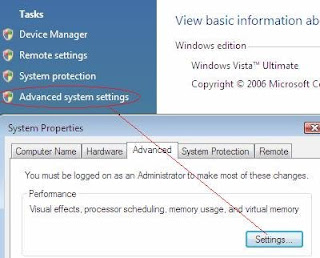
3)Click on Advanced System Settings, and then under Advanced, click Settings


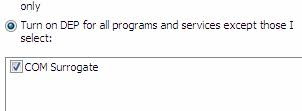
4)Select the "Data Execution Protection" tab, and then click “Turn on DEP for all programs and services except those I select?


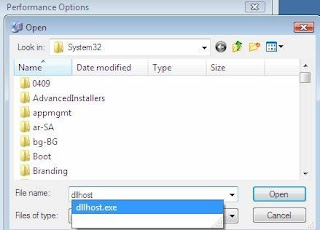
5)Click on the Add button, and then browse to C:\Windows\System32\dllhost.exe as shown


6)Click Open, and then OK.


Enjoy!!!!!!!!!!!

Friday, April 10, 2009

Drive not opening on double click?? autorun.inf virus

Many time many of us have faced this problem that on double clicking the drives they don't open instead it will ask to "open with" ..


its happening because your system is affected with some virus which has created autorun.inf file in your drives.

Steps

1)Open the task manager and see the process tab and try to identify the unknown process and click on end task after selecting it

or process explorer from microsoft might help u

2)Delete its entry from startup too..
[registry startup also]
[HKEY_LOCAL_MACHINE\SOFTWARE\Microsoft\Windows\CurrentVersion\Run]

3)start>run>then type cmd and press enter

type the following commands
4)C:\Documents and Settings\a>cd\ press enter

5)C:\attrib -s -h -r autorun.inf

6)C:\del autorun.inf

7)C:\D: (repeat these commands for each drive you have)

Driveguard.exe virus

driveguard.exe virus

Removal of Driveguard.exe virus is very easy.
1)Open taskmanager and end the process driveguard.exe
2)Any .tmp extension is running then also end that process.
3)type->run->msconfig -> remove its entry
4)Del from temp files.

Tuesday, April 7, 2009

Formatting a pendrive from Fat to NTFS

Plug in your pen drive. Click start & Right click on My Computer.
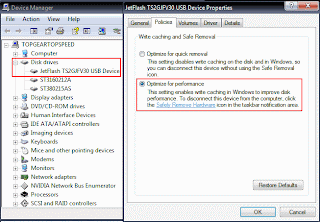
Select Properties > Hardware > Device Manager.

Expand Disk Drives & Click on your Pen Drive Name. ( In my case it’s : Jetflash )
Now Right click on your pen drive name & select Properties.
Go to Polocies Tab & Select Optimize for Performance.


Click OK. Close device Manager.

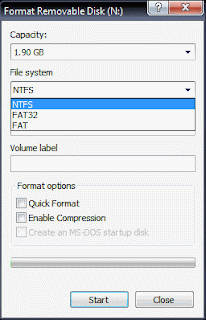
Now open My Computer & Select Your Pen Drive ( ie Removable Disk ).
Right click on it & select Format. Click on File system box.
& Voila! You see the NTFS option.


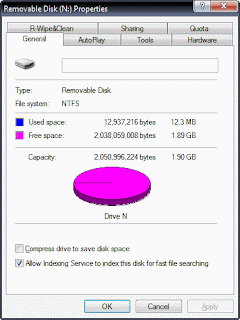
Now select NTFS & fromat your pen drive.


Sunday, April 5, 2009

Traffic generators

1)D-ITG http://www.grid.unina.it/software/ITG/download.php

2)pacgen - Ethernet IP TCP/UDP packet generating tool for Linux
http://nixbit.com/cat/system/networking/pacgen/

3)Hping is a command-line oriented TCP/IP packet assembler/analyzer download

4)Nessus Vulnerability Scanner from Tenable Network Security download

5)Tcpreplay is to resend all packets from its input file(s) at the speed at which they were recorded, at some specified data rate download

6)Nemesis is a command-line network packet crafting and injection utility for for testing Network Intrusion System download

7)PackETH is a *graphical* packet generator tool for ethernet download

Network Monitor Analyzer

1)Wireshark Network Protocol Analyzer-Network protocol analyzer for Windows and Unix that allows examination of data from a live network, or from a capture file on disk
download

2)Ethereal- A Network Protocol Analyzer
download

3)EtherApe is a graphical network monitor for Unix modeled after etherman.Featuring link layer, ip and TCP modes, it displays network activity graphically download

4)SNORT-SNORT is an Open Source Intrusion Detection System download

5)Argus-designed to monitor servers and network connections download

6)ngrep is a "network grep" utility that can be used to match regular expressions within network packet payloads download

7)Nagios for network and service monitoring download

8)NetworkActiv to sniff webpages on a Wi-Fi network download

Saturday, April 4, 2009

Password Cracker

1)Cain and Abel : The top password recovery tool for Windows
UNIX users often smugly assert that the best free security tools support their platform first, and Windows ports are often an afterthought.
download

2)John the Ripper is a fast password cracker, currently available for many flavors of Unix download

3)THC Hydra : A Fast network authentication cracker which support many different services download


4)L0phtcrack : Windows password auditing and recovery application
download

5)Airsnort : 802.11 WEP Encryption Cracking Tool download
download
6)Aircrack : The fastest available WEP/WPA cracking tool
download
7)Brutus : A network brute-force authentication cracker
download
8)Pwdump : A window password recovery tool
download
9)RainbowCrack : An Innovative Password Hash Cracker
download

Rootkit detection

1)chkrootkit: checks locally on a host for signs of rootkits
http://www.chkrootkit.org/download/
2)RootkitRevealer: a rootkit detection utility
http://technet.microsoft.com/hi-in/sysinternals/bb897445(en-us).aspx
3)Ice sword: http://www.antirootkit.com/software/IceSword.htm

4)Rootkit Hunter: one of the newer rootkit checking projects
http://www.rootkit.nl/projects/rootkit_hunter.html

Wednesday, April 1, 2009

How to disable Autoplay

Autoplay is also known as Autorun which should already be disabled for your cd-rom drives because of companies like Sony who like to install DRM on your computer without even asking you. There is a good article from Engadget on how to disable Autorun using a .reg file. This only works for CD-ROM drives and does not disable Autorun for USB drives.

There has been recent news of people gaining access to machines on an internal network using social engineering and USB drives. This guide will show you how to make sure that Autoplay/Autorun is disabled for all devices on your computer. It is highly recommended that you make sure Autorun is disabled for any computers you have access to at work that are running Windows XP. Disabling just the CDROM for your home computers is probably good enough since physical access to those computers is more restricted.

1. Click Start > Run
2. Type “gpedit.msc”
3. Computer Configuration > Click “Administrative Templates” > Click “System” > Double-Click “Turn off Autoplay”
4. Setting tab > Check “Enabled” > Select “All drives” from the drop down menu > Apply > Ok


disable-autoplay

There 4 easy steps to making sure that Autoplay (Autorun) is disabled on all your drives including the USB. That would remove the ability of people to insert a USB drive and automatically run a .exe on your computer by using a *.inf file.

The last thing that you can do to protect yourself is to make sure that you have “Hide extensions for known file types”. This will help you from accidentally clicking on a file that is on a USB drive that looks like it is safe to look at, but is not really. This is one aspect of social engineering that is dependent on the user to make the right decision.

Many criminals will try to mask the presence of a malicious file by adding on .exe to the end of a common file type. For instance .doc.exe or .xls.exe or .jpg.exe would be some examples. The file that you click on is not what you expect it to be rather a virus or a program used to compromise your system. Most anti-virus programs will catch this file after you execute it, but to be on the safe side it is best not to click on it in the first place.

- Open a local folder in Windows Explorer (not IE) like My Documents > Click Tools > Click Folder Options > Click “View” Tab > Uncheck “Hide extensions for known file types”

hide-extensions

Update
I updated some of the links that didn’t work, like the link to the news article about the Sony DRM and the old .reg file. I found a copy of the reg file somewhere else on the internet and rehosted it here so it doesn’t disappear again.

Friday, March 20, 2009

How to check if someone has blocked you on Google Talk

There is a great little instant messaging utility, Pidgin that helps
to find who has blocked you in Google Talk. If you not sure how to
configure Pidgin with Google Talk, I advice you to first visit this
page.

Ok, now when you are aware of how to configure Pidgin to work with
Google Talk, I'll guide how to make smart use of Pidgin to identify
who has blocked you on Google Talk.

It's very simple. Just follow the steps:-

1- Log in to your Gmail account on Pidgin.
2- Go to "Buddies" -> "Show Offline Buddies". (A person who has
blocked you must be showing offline to you. So you need to make all
offline friends visible)

3- Now all your contacts are visible to you. Pick any one of those.
4- Right Click on your chosen contact name and select "Get Info".

It will show you the brief information of your contact. Now, if any of
your contact has blocked you on Google Talk, you will not be able to
see his/her profile.

6- Select a contact who you think may have blocked you. Again, Right
Click on his/her name and select "Get Info". You will not see
anything. Not even the contact's name.

This goes to show that this particular contact has blocked you on
Google Talk and don't want to talk to you and so it appears to be
offline always.

Hope, you like this article. This is the only way I could able to find
out to determine who has blocked you on Google Talk. What's your
comment on this?

How to find invisible friends in GTalk,GMAIL

Here is the simple trick to find the friends who are online in gtalk but appearing offline.

Follow these steps to check who all are in invisible state.

1. Open the chat window by clicking your friend’s name
2. Click you friends name and select “Go off the Record”.
3. Send some message to that user.
4. if you get the feedback from gtalk that “User is offline and can’t receive messages” in red color means that the user is really offline.
5. But if you get no response that means that the user is appearing offline and in invisible mode

Difference between CGPA and SGPA?

CGPA is the cumalative grade point average and
SGPA is semester grade point average.

Grade point is a system in which points are given between 0.00 to maximum of 4.00 depending upon the grade obtained in a particular course.

SGPA is the average of grade point obtained in a single semester while
CGPA is the average of grade point obtained as whole.

CALCULATE CGPA

Calculating your CGPA/SGPA is not an uphill task, it requires little smart work. First you need to know the number periods per week of each subject .After that you will calculate the credits of each subject. Say in first you have 7 subjects :


*Physics: 3 lectures 1 tutorial
*Chemistry: 3 lectures 1 tutorial
*Math: 3 lectures 2 tutorials
*ECO: 3 lectures 1tutorial
*ELECTRICAL :2 lectures 1 tutorial
*Basic Electronics: 2 lectures 1 tutorial
*Engineering Drawing :3 classes
*Physics PRAC: 2 Classes
*Chemistry PRAC: 2 Classes
*Basic ELECTRICAL PRAC:2 Classes


Now each lecture has one credit and each prac or tutorial has 0.5 credit. So , in the above case


Physics,Chemistry,ECO has 3.5 credit each;

Math has 4 credit ;

Basic ELECTRICAL, Basic Electronics has 2.5 credit.

All practical have 1 credit.

Engineering Drawing has 1.5 because its classes are not considered as lectures but they are treated as tutorials.

This was all about calculating credits.


In each subject you get some grade, which you get according to your marks ,they have been given in below .Points have been allotted to each grade.


A+(85&above) ---------- 10

A(75-84) ---------- 9

B (65-74) ----------- 8

C (50-64) ---------- 6

D (40-49) ---------- 4

E (39 & below) ------ 2


If you get E grade you don’t pass the course,you will have to appear again in that course.


So your SGPA that is your grade point aggregate for semester is calculated as follow:


SGPA=∑{credit of subjectn*points u get in subject n}/total credits


CGPA=∑{credit of semester*SGPA of semester}/total credits so far

Monday, February 23, 2009

online MD5 crackers

http://www.md5lookup.com/
http://md5.rednoize.com
http://nz.md5.crysm.net
http://us.md5.crysm.net
http://www.xmd5.org
http://gdataonline.com
http://www.hashchecker.com
http://passcracking.ru
http://www.milw0rm.com/md5
http://plain-text.info
http://www.securitystats.com/tools/hashcrack.php
http://www.schwett.com/md5/
http://passcrack.spb.ru/ ->sha1
http://shm.pl/md5/
http://www.und0it.com/
http://www.neeao.com/md5/
http://md5.benramsey.com/
http://www.md5decrypt.com/
http://md5.khrone.pl/
http://www.csthis.com/md5/index.php
http://www.securitystats.com/tools/hashcrack.php ->sha1
http://www.md5decrypter.com/
http://www.md5encryption.com/ ->sha1
http://www.md5database.net/
http://md5.xpzone.de/
http://www.milw0rm.com/md5/info.php
http://md5.geeks.li/
http://www.hashreverse.com/ ->sha1
http://www.cmd5.com/english.aspx
http://www.md5.altervista.org/
http://md5.overclock.ch/biz/index.php?p=md5crack&l=en
http://alimamed.pp.ru/md5/
http://md5crack.it-helpnet.de/index.php?op=add
http://cijfer.hua.fi/
http://shm.hard-core.pl/md5/
http://www.mmkey.com/md5/HOME.ASP
http://www.thepanicroom.org/index.php?view=cracker
http://rainbowtables.net/services/results.php ->sha1
http://rainbowcrack.com/ ->sha1
http://www.securitydb.org/cracker/
http://passwordsecuritycenter.com/in...roducts_ id=7
http://0ptix.co.nr/md5
https://www.astalavista.net/?cmd=rainbowtables
http://ice.breaker.free.fr/
http://www.md5this.com
http://www.shalookup.com/ ->sha1

lm Only:
http://sys9five.ath.cx:8080/hak5rtables/
http://lasecwww.epfl.ch/~oechslin/projects/ophcrack/
some more links
http://linardy.com/md5.php
http://www.gdataonline.com/seekhash.php
http://www.md5-db.com/
https://www.w4ck1ng.com/cracker/
http://search.cpan.org/~blwood/Digest-MD5-Reverse-1.3/
http://www.hashchecker.com/index.php?_sls=search_hash
http://www.milw0rm.com/md5/
http://www.mmkey.com/md5/
http://www.rainbowcrack-online.com/
http://www.securitydb.org/cracker/
http://www.securitystats.com/tools/hashcrack.php
http://schwett.com/md5/
http://www.und0it.com/
http://www.md5.org.cn/index_en.htm
http://www.xmd5.org/index_en.htm
http://www.tmto.org
http://md5.rednoize.com/
http://nz.md5.crysm.net/
http://us.md5.crysm.net/
http://gdataonline.com/seekhash.php
http://passcracking.ru/
http://shm.pl/md5/
http://www.neeao.com/md5/
http://md5.benramsey.com/
http://www.md5decrypt.com/
http://md5.khrone.pl/
http://www.csthis.com/md5/index.php
http://www.md5decrypter.com/
http://www.md5encryption.com/
http://www.md5database.net/
http://md5.xpzone.de/
http://www.hashreverse.com/
http://alimamed.pp.ru/md5/
http://md5crack.it-helpnet.de/index.php?op=add
http://shm.hard-core.pl/md5/
http://rainbowcrack.com/
http://passwordsecuritycenter.com/index.php?main_page=product_info&cPath=3&products_id=7
https://www.astalavista.net/?cmd=rainbowtables
http://ice.breaker.free.fr/
http://www.md5this.com/
http://hackerscity.free.fr/
http://md5.allfact.info/
http://bokehman.com/cracker/
http://www.tydal.nu/article/md5-crack/
http://passcracking.com/
http://ivdb.org/search/md5/
http://md5.netsons.org/
http://md5.c.la/
http://www.md5-db.com/index.php
http://md5.idiobase.de/
http://md5search.deerme.org/
http://sha1search.com/

Hiding a Drive

1) Go to Start -> Run -> “regedit”
2) Navigate to: HKEY_CURRENT_USER/Software/Microsoft/Windows/CurrentVersion/Policies/Explorer
3) Choose Edit -> New -> DWORD Value and give name NoDrives.
4) Double click NoDrives and determine which drive that you want to vanish in Value Data.

Ex: If you wish to vanish drive E:, insert value 16 in Value Data.
The combination value in “Value Data” are as following:
A: > 1
B: > 2
C: > 4
D: > 8
E: > 16
F: > 32
G: > 64
H: > 128
I: > 256
J: > 512
K: > 1024
L: > 2048
M: > 4096
All: > 67108863

Simple Ways of Speeding Up Windows XP

I just finished setting up a new PC for a friend and I think some of you will be interested in some of the adjustments can I make all my computers to make them faster. I'm here focused on those that are simple to make and will not cause problems if you get ill, instead of registry settings etc. Quoting

1. Disable indexing services

Services Index is a bit small program that uses a large amount of RAM and can often make a computer endlessly loud and noisy. This process of system updates and lists of indexes all files on your computer. He does this so that when you do a search for something on your computer, it will look for faster scanning the index lists. If you do not search your computer frequently, or even if you do search often, this system service is completely unnecessary. To disable do the following:

* Go to Start
* Click Settings
* Click Control Panel
* Double-click Add / Remove Programs
* Click Add / Remove Window Components
* Clear the indexing service
* Click Next

2. Optimizing display settings

Windows XP can look sexy, but displaying all the visual elements can waste system resources. To optimize:

* Go to Start
* Click Settings
* Click Control Panel
* Click System
* Click the Advanced tab
* In the Performance tab, click Settings
* Leave only noted the following:

* Show shadows under menus
* Show shadows under mouse pointer
* Show translucent selection rectangle
* Use drop shadows for icon labels on the desktop
* Use visual styles on windows and buttons

3. Speedup folder browsing

You may have noticed that everytime you open my computer to browse folders that there is a slight delay. This is because Windows XP automatically searches for files and network printers everytime you open Windows Explorer. To correct this and to significantly increase navigation:

* Open My Computer
* Click on the Tools menu
* Click on the Folder Options
* Click the View tab.
* Clear the Automatically search for network folders and printers on the box
* Click Apply
* Click OK
* Reboot the computer
4. Disable Performance Counters

Windows XP has a performance monitor utility Monitors which several areas of your PC's performance. These utilities take up system resources so disabling is a good idea.

To disable:

* Download and install the Extensible Performance Counter List
* Then select each counter in turn in the 'Extensible performance counters' window and clear the' performance counters enabled 'below bottom.button checkbox at the

5. Improve Memory Usage

Cacheman Improves the performance of your computer by optimizing the disk cache, memory and a number of other settings.

Once installed:

* Go to Show Wizard and select All
* Run all the wizards by Selecting Next Finished or until you are back to the main menu. Use the defaults unless you know exactly what you are doing
* Exit and Save Cacheman
* Restart Windows

6. Optimizing your internet connection

There are lots of ways to do this but by far the easiest is to run TCP / IP Optimizer.

* Download and install
* Click the General Settings tab and select your Connection Speed (Kbps)
* Click Network Adapter and choose the interface you use to connect to the Internet
* Check Optimal Settings then Apply
* Reboot

7. Optimizing Your Pagefile

If you give your pagefile a fixed size it saves the operating system from Needing to resize the page file.

* Right click on My Computer and select Properties
* Select the Advanced tab
* Under Performance choose the Settings button
* Select the Advanced tab again and under Virtual Memory select Change
* Highlight the drive containing your page file and make the initial Size of the file the same as the Maximum Size of the file.

Windows XP sizes the page file to about 1.5X the current amount of physical memory by default. While this is good for systems with smaller amounts of memory (under 512MB) it is unlikely that a typical XP desktop system will ever need 1.5 X 512MB or more of virtual memory. If you have less than 512MB of memory, leave the page file at its default size. If you have 512 or more, change the ratio to 1:1 page file size to physical memory size.
8th Run BootVis - Improve Boot Times

BootVis will significantly improve boot times

* Download and Run
* Select Trace
* Select Next Boot and Driver Trace
* A Trace repetitions screen will appear, select OK and Reboot
* Upon reboot, BootVis will automatically start, analyze and log your system's boot process. When it's done, in the menu, go to Trace and select Optimize System
* Reboot.
When your machine has rebooted wait until you see the Optimizing System box appear. Be patient and wait for the process to complete


9th Remove the Desktop Picture

Your desktop background consumes a fair amount of memory and can slow the loading time of your system. Removing it will improve performance.

* Right click on desktop and select Properties
* Select the Desktop tab
* In the Background window select None
* Click OK


10th Remove Fonts for Speed

Fonts, especially TrueType fonts, use quite a bit of system resources. For optimal performance, trim your fonts down to just those that you need to use on a daily basis and fonts that applications may require.

* Open Control Panel
* Open Fonts folder
* Move fonts you do not need to a temporary directory (eg C: \ FONTBKUP?) Just in case you need or want to bring a few of them back. The more fonts you uninstall, the more system resources you will gain.

Hope you find these 10 tips useful please leave a comment below and please share any other tips you may have with other readers.

Speed Up Boot Times in Windows XP

Speed Up Boot Times in Windows XP

This tweak works by creating a batch file to clear the history and temp folders everytime you shutdown so that your PC does not waste time checking these folders the next time it boots. It's quite simple to implement:

1. Open Notepad and create a new file with the following entries:

* RD / S / q "C: \ Documents and Settings" username without quotes "\ Local Settings \ History"
* RD / S / q "C: \ Documents and Settings \ Default User \ Local Settings \ History"
* RD / S / q "D: \ Temp" <- "Deletes temp folder, type in the location of your temp folder"

2. Save the new as anything you like but it has to be a '. Bat' files eg fastboot.bat or deltemp.bat

3. Click 'Start' then 'Run'

4. Type in 'gpedit.msc' and hit 'ok'

5. Click on 'Computer Configuration' then 'Windows Settings'

6. Double-click on 'Scripts' and then on' Shutdown '

7. Click 'Add' and find the batch file that you created and then press' Ok '

When your PC starts it usually looks for any media in any bootable floppy or CD-ROM drives you have installed before it gets around to loading the Operating System from the HDD. This can waste valuable time. To fix this we need to make some changes to the Bios.

1. To enter the bios you usually press' F2 'or' delete 'when your PC starts
2. Navigate to the 'Boot' menu
3. Select 'Boot sequence'
4. Then either move your Hard drive to the top position or set it as the 'First Device'
5. Press the 'escape' key to leave the bios. Do not forget to save your settings before exiting

Note: Once this change has been made, you will not be able to boot from a floppy disk or a CD-ROM. If for some strange reason you need to do this in the future, just go back into your bios, repeat the steps above and put your floppy or CD-ROM back as the 'First Device'

When your computer boots up it usually has to check with the network to see what IP addresses are free and then it grabs one of these. By configuring a manually assigned IP address your boot time will improve. To do this do the following:

1. Click on ‘Start’ and then ”Connect To/Show All Connections’
2. Right-click your network adapter card and click ‘Properties’
3. On the ‘General’ tab, select ‘TCP/IP’ in the list of services and click ‘Properties’
4. In the TCP/IP properties, click ‘Use the following address’ and enter an IP address for your PC. If you are using a router this is usually 192.168.0.xx or 192.168.1.xx. If you are not sure what address you could check with your ISP or go to ‘Start/run’ and type ‘cmd’ and then ‘ipconfig/all’. This will show your current IP settings which you will need to copy
5. Enter the correct details for ‘Subnet mask’, ‘Default gateway’ and ‘DNS Server’. Again if you are not sure what figures to enter use ‘ipconfig/all’ as in stage 4.

Free Up Memory in Windows XP

Free Up Memory in Windows XP

I found this useful app via FixMyXP. ClearMem is an Excellent Tool for speeding up your XP Computer (especially if your system has been on for awhile and you have a lot of applications open). What it does, is it Forces pages out of physical memory and reduces the size of running processes if working sets to a minimum. When you run this tool, the system pauses because of excessive high-priority activity associated with trimming
the working sets. To run this tool, your paging file must be at least as large as physical memory. To check your Paging File:

1. Go to your control panel, then click on ‘System’, then go to the ‘Advanced’ Tab, and Under ‘Performance’ click ‘Settings’ then the ‘Advanced’ Tab
2. On the Bottom you should see ‘Virtual Memory’ and a value. This is the value that must be at least as large as how much memory is in your system
3. If the Virtual Memory Value is smaller than your system memory, click Change and change the Min Virtual Memory to a number that is greater than your total system memory, then click ‘Set’ and Reboot
4. Once you have rebooted install ClearMem

Ensure XP Is Using DMA Mode for Faster Performance

XP enables DMA for Hard-Drives and CD-Roms by default on most ATA or ATAPI (IDE) devices. However, sometimes computers switch to PIO mode which is slower for data transfer - a typical reason is because of a virus. To ensure that your machine is using DMA:

1. Open ‘Device Manager’ 2. Double-click ‘IDE ATA/ATAPI Controllers’ 3. Right-click ‘Primary Channel’ and select ‘Properties’ and then ‘Advanced Settings’ 4. In the ‘Current Transfer Mode’ drop-down box, select ‘DMA if Available’ if the current setting is ‘PIO Only’

Remove Annoying Delete Confirmation Messages - Windows XP

Although not strictly a performance tweak I love this fix as it makes my machine ‘feel’ faster. I hate the annoying ‘are you sure?’ messages that XP displays, especially if I have to use a laptop touchpad to close them. To remove these messages:

1. Right-click on the ‘Recycle Bin’ on the desktop and then click ‘Properties’ 2. Clear the ‘Display Delete Confirmation Dialog’ check box and click ‘Ok’If you do accidently delete a file don’t worry as all is not lost. Just go to your Recycle Bin and ‘Restore’ the file.

Disable Prefetch on Low Memory Systems - Windows XP

Prefetch is designed to speed up program launching by preloading programs into memory - not a good idea is memory is in short supply, as it can make programs hang. To disable prefetch:

1. Click ‘Start’ then ‘Run’ 2. Type in ‘Regedit’ then click ‘Ok’ 3. Navigate to ‘HKEY_LOCAL_MACHINE\SYSTEM\CurrentControlSet\Control\Session Manager\Memory Management\PrefetchParameters’ 4. Right-click on “EnablePrefetcher” and set the value to ‘0′ 5. Reboot.

Removing the problem of System Hang at Startup

If your system hangs about 2 or 3 minutes at startup, where you can't access the Start button or the Taskbar, it may be due to one specific service (Background Intelligent Transfer) running in the background. Microsoft put out a patch for this but it didn't work for me. Here's what you do:

1. Click on Start / Run, type 'msconfig', then click 'OK'.
2. Go to the 'Services' tab, find the' Background Intelligent Transfer 'service, disable it, apply the changes & reboot.

Wednesday, January 28, 2009

RedHat Enterprise Linux 5 is asking a installation key

Many of you Installing the RedHat Enterprise Linux 5 it ask for Installation key

so all search ended here the Installation key is 16-character hexadecimal text string

22eda90c23f9e5a9

or

http://www.redhat.com/support/resources/faqs/installation_numbers/#what_is

from above link you will know about the INSTALLATION NUMBER

Tuesday, January 20, 2009

XP Logon Banner

Windows XP operating systems allow a login with a username
and password before the system can be used. The following method causes a
dialog box with the warning banner and an OK button to be displayed before the
system displays the login dialog box on Windows 95/98/ME and after pressing
Ctrl-Alt-Del on Windows XP.

To create a login banner on these Windows systems you must add two
keys to the Windows registry. There are two ways to edit the registry. One is
to edit it directly; the second is to create a .reg file containing the
required changes and to execute the file with regedit.

The following registry key and values set the local login banner.

Key:
HKEY_LOCAL_MACHINE\SOFTWARE\Microsoft\Windows NT\CurrentVersion\WinLogon

Values:
LegalNoticeCaption = "The caption text."
LegalNoticeText = "The body of the banner."

Starting with Windows 2000, there is a second registry key and values associated
with Login banners. These keys are set with active directory. If these active
directory local policy values are defined, they take precedence over the local
settings in the WinLogon key above.

Key:
HKEY_LOCAL_MACHINE\SOFTWARE\Microsoft\Windows\CurrentVersion\Policies\system

Values:
LegalNoticeCaption = "The local policy caption text."
LegalNoticeText = "The local policy body of the banner."

Perform these steps to create a login banner on Windows systems.


This banner appears as a dialog box just before the system displays the login
dialog box.

Sunday, January 4, 2009

flazx Ebook problem - .r00 extension problem & Solution (Ebooks)

Here's the problem. Last time my friend had downloaded E-Book named "RHCE.Red.Hat.Certified.Engineer.Linux.Study.Guide.Exam.RH302" from the link http://www.flazx.com in Zip Format

when he had unzipped the file he found 5 files named (WINRAR as my default unzipper)
b-140b01(Zip file)
b-140b02(Zip file)
b-140b03(Zip file)
b-140b04(Zip file)
bbl (.nfo format)

when he unzipped b-140b01 file he found files named

bbl(Zip file)
BBL(.nfo format)

when he tried to unzip bbl.zip it is ask for a file named "bbl.r00" which has got .r00 extension

So is bbl.r00 in this file at all?

If not you won't be able to extract anything, until u find this file.


so solution is here .....................
|
|
|


Ans:extract all the zips into the same directory, then just extract any one of the

it will ask for "The following file already exist..... Would you like to replace ..... click on Not to all"

same step should be followed for all zip file


1)bbl.rar
2)bbl.r00
3)bbl.r01
4)bbl.r02

now right click on bb1.r00 Extract here

after 5.0 sec McGraw.Hill.RHCE.Red.Hat.Certified.Engineer.Linux.Study.Guide.Exam.RH302.5th.Edition.Jun.2007.chm

willbe founded


OOOOOOOOOOOO0 this perfect solution for this problem